Creating apps for the Google Assistant
Arunava Roy Choudhury |
feedback@digit.in
GOOGLE HOME
Google Home is the latest in a long line of market disrupting products that have come from the path breaking technology company. It is a collection of smart speakers that enable users to use voice commands in order to interact with services through Google’s intelligent personal assistant called
Google Assistant. Google Assistant hosts a large number of services, both within and outside Google that are integrated and synchronized, allowing users to perform a variety of tasks from listening to music, to playing videos or viewing photos on your smart TV, or even receiving news updates en-
tirely by voice. These devices also have support for home automation, letting users control smart home appliances such as air conditioners and security alarms with their voice. You can even set up multiple such devices across a home to allow synchronized playback of music and complete automation. In 2017, Google even added a special feature that allows the Google Assistant to detect and distinguish between up to six voices.
GOOGLE ASSISTANT & ACTIONS ON GOOGLE
Google Assistant is a virtual personal assistant (VPA) developed by Google that is at the heart of its Google Home product. A VPA can engage in two-way conversations with the user and, much like a real assistant, can carry out a number of tasks for them such as organizing mail, scheduling reminders and many such activities that would otherwise need human intervention. With “Actions on Google” , a platform for app development, Google allows developers to develop their own services and apps that they can integrate with the Google Assistant and harness its two-way conversational interface for users.
Let us take a look at how an app on the Google Assistant looks like.
APPS ON GOOGLE ASSISTANT
A typical app for the Google Assistant can be broadly broken down into the following three parts:
Actions and Invocation
‘Actions on Google’ defines a way for the users to invoke apps for the Assistant through action-based voice commands such as “book an Uber” or “play a game”. Every app must define at least a main action that lets users invoke it by name. In addition, it can then define additional actions that deep-link into the app through different entry points. An example of a deep-link invocation would be “Ok Google, Ask Stargazer to show me the star map for tomorrow” which, when spoken, should fire an intent to request the star map over the user location for the next day. These deep-link invocations are what make
Actions really interesting.
Conversation
This is the UI of your app and defines how users interact with your app after it’s invoked by Actions on Google. This is further simplified with the use of a platform known as Dialogflow. Dialogflow is a framework that allows you to quickly prototype and design the flow of conversations for your app with built-in machine learning and natural language understanding, so you don’t have to define an exhaustive
grammar. You can also define how to pick up parameters from the user’s input in Dialogflow, making it even easier to understand what the user said. Once you build your conversation in Dialogflow, you then define how the app responds to the user in a segment called Fulfillment.
Fulfillment
While Dialogflow handles much of the heavy lifting of understanding natural language and parsing the data you need from user input, the conversation with the user will probably require the app to perform some business logic to respond to the user and to complete the task. To do this a web service (called fulfillment) is called. This web service is designed by implementing the Dialogflow webhook, which is a
JSON-based protocol that defines a schema for interacting with Google Assistant from an external service. When users say something, the app receives some text and a set of parameters from that data. Then it uses this data to return a response to move the conversation ahead.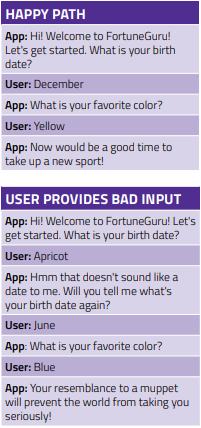
DESIGN AN APP
In the following segments we will attempt to design our own app for the Google Assistant platform. In the spirit of the new year, let us try to keep things light and try to design an application that tells you your fortune in a comic manner. To start off, we should come up with a set of sample conversations to get an idea of how we want our app to look. Thankfully, as we said, prototyping on Dialogflow is
pretty easy.
Create an Actions project and Dialogflow agent
To develop for Actions on Google, you need to create an Actions project and Dialogflow agent. The Actions project lets you register your actions, manage your app through the approval process, view analytics for your app, and more. The Dialogflow agent defines what users can say to your app and
how your app processes user input.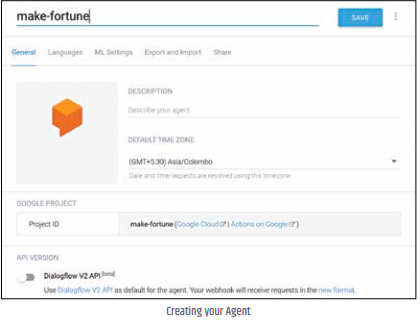
Creating an Actions Project
• Open the Google Developer Console > navigate to Actions on Google.
• Click on Add Project, enter FortuneGuru for the project name, and click Create Project.
• In the Dialogflow flashcard, click on the BUILD button and then ‘Create Actions On Dialogflow’ to start building actions.
• On the next screen, you see the Dialogflow console with information automatically populated in
an agent. Click Create to save the demo agent.
Your agent will eventually call some fulfillment logic that you’ll build later to return a response
with the user’s fortune, but for now let’s keep a dummy fulfillment.
• Click the Fulfillment menu item and then move the disabled slider for Webhook to the right to ‘Enabled’. Enter a dummy URL for now, like https://fortune.guru.fulfillment. We’ll update this URL when our actual fulfillment service is ready. Finally click Save.
Define actions and invocation
• When creating a Dialogflow agent a default intent is automatically created. This intent represents
the main entry to your conversation app. All your apps must have at least this main action defined,
so that Actions on Google knows how to invoke your app. The intent has an action field that specifies
an action name. When an intent is triggered, this is sent to your fulfillment so it can map the action’s name to the task to carry out.
• For the default Welcome Intent, delete the pre-populated responses in the Text response fields by clicking on the trash can icon in the upperright corner. Click on ADD MESSAGE CONTENT > Text response, specify the following response instead, and click Save.
“Hi! Welcome to FortuneGuru! Let’s get started. What is your birth date?”
• Now, when users invoke your app, they face the above welcome message and can know experience your app. In general, responses should guide users on what to say next and to stay within your conversation
grammar.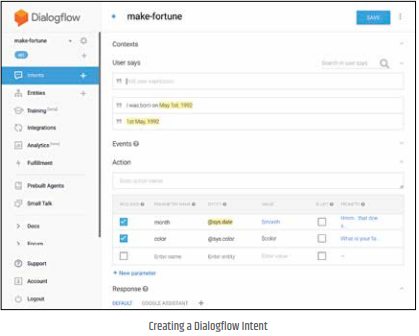
Define your conversation grammar
• A group of Dialogflow intents collectively constitute your app’s conversation grammar and what tasks to carry out when users speak particular phrases of your grammar. As Dialogflow already pre-packages a natural language understanding (NLU) engine, it automatically expands on the phrases you provide and understands many more variations of them.
• Let us create an intent that defines how users need to provide their birth date and favourite colour to generate their fortune.
• Start by clicking on Integrations in the left navigation, and make sure the Google Assistant
card is enabled.
• In the left navigation, click the + icon by the Intents menu item.
• In the Intent name field, enter make-fortune.
• In the User says field, enter My birth date is May and hit Enter.
• Click and highlight the String May and assign it the @sys.date entity in the drop-down menu
that appears.
• Provide a few more variations of the response phrases like: May,I was born in May etc.
• In the Actions section, select the REQUIRED checkbox for the date parameter. This tells Dialogflow to not trigger the intent until the parameter is properly provided by the user.
• Click on Define prompts for the parameter and provide a reprompt phrase. This phrase is spoken to the user repeatedly until the Dialogflow detects a date in the user input.
• In the Actions section, create another new parameter to capture the color information just as you have captured date info. This additional parameter uses Dialogflow’s builtin “slot-filling” feature, which allows you to obtain additional input parameters from the user without having to create an intent for each one and without having to make the user speak all of the required input in one phrase. Slot filling also lets you set parameters as Required so that your agent doesn’t process the input until the user provides all required parameters in response.
• Click SAVE to save the entire intent. That’s it! You’ve now used Dialogflow to return a static response to the user when they invoke your app. You can also return a real-time fulfillment from the user using the webhook defined earlier. This exercise is left to the user.
PREVIEW THE APP
Now that you have your fulfillment deployed and properly set in Dialogflow, you can preview the app in the Actions simulator. To preview your app, turn on the Web & App Activity, Device In formation, and Voice & Audio Activity permissions on the Activity controls page for your Google account. Without
this you will not be able to use the Actions Simulator, which lets you test your actions on the web without a hardware device. Click on try in Google Assistant link on the upper right hand side of the Actions page.
Note: If you’re presented with the Actions simulator splash screen, click Start to authenticate with your Google account. In the Actions Simulator, type in talk to my test app in the Input area of the simulator to begin testing the app. Enter a birth date and then a color when the app prompts you to
receive your ‘fortune’.
PRE-RELEASE
Now that we have successfully designed conversations and developed actions, let us take a look at how to share them with users. Before you make your agent available to Google Assistant users, however, make sure that it’s discoverable and also completely ready for deployment. Here are a few things that you could do to make sure that’s the case.
• Review your Actions to verify that they’re working properly and comply with Google’s policies. Get
your apps approved and deployed as smoothly as possible by reviewing them for common errors and
easy-to-miss policy violations.
• Get ready for deployment by preparing your assets and information for your listing. As part of the
submission process, you provide Google with images and descriptions for use in the Directory listing.
• Review your invocation methods. Follow the guidelines for creating good invocation name and triggering phrases. Users access and find out about your apps through triggering phrases, so it’s worthwhile to spend some time reviewing invocation. You may also want to register and reserve your invocation name before you’re ready for deployment, just to avoid someone else already reserving it.
PREPARE FOR DEPLOYMENT
When you submit your app for approval, Google expects and verifies that they meet a minimal set of
requirements before publishing them to users. Use the following pointers to prepare your app and submit them for review.
• Check for policy violations: Verify that your action follows the policies for Actions on Google.
• Be specific: Users must be able to call your invocation, specifically. Don’t be too abstract or general, since you want users to trigger your action. For example, use “Talk to WeatherApp to check the weather for [city]” instead of “Check the weather for [city]” as the appropriate action phrase.
• Avoid prohibited content: Unless it serves a scientific, artistic or educational purpose, apps with
explicitly sexual, violent, illegal, or hateful content violate the policies and will consequently be rejected or taken down.
• Respect copyrights and intellectual property: Make sure you have adequate rights to use the content
offered by your app.
• Be honest: Don’t mislead or deceive users with false claims or promises and always be clear about what your app can exactly do.
• Protect users’ privacy and security: Be transparent in how you handle user data, transmit user
data securely, and provide a general privacy or data policy.
Don’t listen to users unprompted: Make sure your app notifies the user when it’s waiting for a command, to reduce the risk that your app is rejected. It is against the policies to listen to a user without explicitly specifying a ‘prompt’ that notifies them of such behaviour.
• Review your invocation and display names: Make sure your invocation name is consistent with the display name, and that both are specific enough that users can easily call your action. Your invocation and display names must also follow the policies for Actions on Google. This is how people will instinctively know how to initiate a conversation with your app or give it a command, so yeah, this is quite important.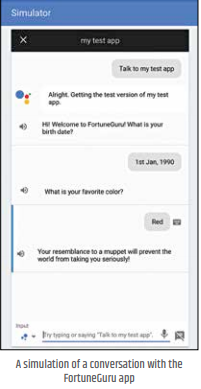
TEST YOUR APP
This is when you make sure everything works. Check for the common errors and violations such as the
Transport Protocol’s security, verification of the HTTPs (TLS) encryption on the transport for your webhooks.
Then go ahead and ensure that you’re signing your webhook requests and verifying them in your webhook. Disable SmallTalk, if you want to avoid answers to inquiries like “hello”
and “goodbye”. Not all apps are intended to be chatty.
Also, make sure that the app name you’ve set consistently triggers your app. Use a hardware device and speak your invocation name repeatedly, in real-world scenarios (i.e., with noise in the background, or at different distances from the device). If your invocation name is not consistently recognized, you may need to look at a way to change it.
Finally, try to test on real devices. While the web simulator is great for testing your app quickly during development, you should always test invocation and dialogs on real devices, such as voice-activated speakers. This is the best way to be sure about the functioning of your app in real life so that you can go ahead and create a truly fulfilling experience for the user.