
Now that we have broken down our slider puzzle app into smaller tasks, let’s dwell on the actual development process using a Mac, and of course, Xcode. You can download Xcode from Apple’s website.
The following few steps would be involved in the development of our slider puzzle app.
- You first need a table to present your images in a compact manner and effectively display the puzzle name or number.
- When initiated, the puzzle pops up the game with a begin message on a new screen.
- The background of the puzzle must be broken into pieces depending on the number of tiles and the shape. It entirely depends on your choice as a developer to choose the number of tiles and the shape of them as well. To begin with, you can choose 3, which is simpler.
- Space the tiles with a blank line between them to add impact.
- Ensure that you create a blank space for the player to move the tile around to complete the puzzle.
- The directions for moving the tile should be clear and very accurate.
- Once you have done this, shuffle all the tiles and make them random such that it imparts the image of a broken picture and requires arrangement.
- When the puzzle is complete, ensure a pop up message is displayed.
Let’s start at the top of list and make an extremely simple version of the puzzle that first display only a table with a name. When you tap on the name, it takes you to the next page with a pop up. This is the foundation for the rest of the work.

Launch Xcode on your Mac. If you have trouble locating Xcode, you can find it in the folder /developer/applications/Xcode
I have used an older version of Xcode (3.2.6); but you can use the latest version.
Below screen appears when you launch xcode.

Click on create a new project and you see the below screen. This screen allows you to chose a template for your project. The template you chose will depend on the type of application you want to develop. In this case we will select a window based application.

Click “Choose” button at the bottom and xcode is about to create your first project. Give the name to your app an click Save.

The next screen shows you the project files created by xcode. You can see that xcode has itself created all the required files you see under “Groups & Files”.

Now to see your app in the iphone simulator, you just need to click “Build and Run” button.

Xcode will shake a bit and then it will launch your first app in the iOS Simulator. Though its just a blank screen with nothing functional, but you have at least learnt the first important step.
![]()
If on pressing the Run button, Xcode says “Build Failed”, make sure the select box called Scheme at the top-left says “Simulator-4.3|Debug|SliderPuzzleGame” (or a newer version). Make sure your phone is not connected to mac while performing above tasks.

So far there were easy steps. We now need to add new files so a little more concentration is required. You should follow the steps shown in below screenshot.

You then need to choose which type of file you need and don’t forget to tick Xib. As shown for table adding, I choose UIViewController, tick on “with xib for User Interface” and then press next.

Then fill the credentials like what file name you want to give and press Finish.

After this you will see 3 new files added into your project.

Now select .xib file and double click to open it. You will see a view where we have to add table.


Select tools > select library


From here select table view and drag it to the white appearing view and adjust according to its size .

Right click on the table you just added over view and attach by linking dataSource and delegates from there to tableSliderXib File owner as shown.

After linking it looks like this.

Now go to Your app delegate file and create object for navigation controller and initialize it with tableSlider object then add the navigation controller object over the window .It will show view with table and will also enable navigation in the project.
First click on sliderpuzzleappdelegate.h and write the below code in this file
.h @property (nonatomic,retain) tableSlider *imageTable; @property (nonatomic, retain) IBOutletUINavigationController *navigationController; .m //it should be written in didFinishLaunching:- imageTable = [[tableSlideralloc] init]; navigationController = [[UINavigationControlleralloc]initWithRootViewController:imageTable]; self.window.rootViewController = self.navigationController; Also add new file SliderController for showing puzzle image. Then go to YourtableSlider class and take array to display names of puzzle on the table In ViewDidload- array=[[NSMutableArrayalloc]init]; [arrayaddObject:@"Puzzle One"]; [arrayaddObject:@"Puzzle Two"]; [arrayaddObject:@"Puzzle Three"]; [arrayaddObject:@"Puzzle Four"]; [arrayaddObject:@"Puzzle Five"]; [arrayaddObject:@"Puzzle Six"]; Then implement methods for table view according to your requirements like:- - (NSInteger)numberOfSectionsInTableView:(UITableView *)tableView - (NSInteger)tableView:(UITableView *)tableViewnumberOfRowsInSection:(NSInteger)section - (UITableViewCell *)tableView:(UITableView *)tableViewcellForRowAtIndexPath:(NSIndexPath *)indexPath { //write code for displaying name and images here. Use indexpath.row to get specific row and set value. } - (void)tableView:(UITableView *)tableViewdidSelectRowAtIndexPath:(NSIndexPath *)indexPath { //write code for navigation to view puzzle index wise i.e image wise useindexpath.row to navigate from particular cell of tableview. } Above code insertion steps are also shown in below series of screenshots.


After performing all these steps we finally get output as shown after running the application

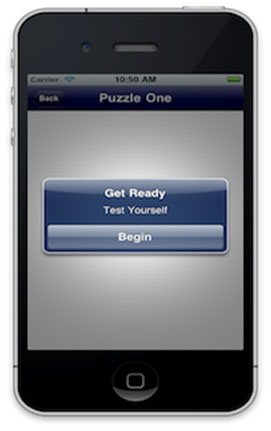
Then click on any table cell and after navigation you will see a pop up.

A new class of type UIImageview should be added for tiles creation (creating tiles of an image) containing variables of CGPoint.
Since we are creating tiles so we keep file name as tiles and we add new file of type UIImageView as we added two files before same steps to be followed.
In Tiles class .h we create two CGPoint one for originalPosition and other ForcurrentPosition.
And set its property as @property (nonatomic, readwrite) CGPointoriginalPosition;
Now When we run after adding image on sliderController, we will have image along with popup the image will be tilled as we have divided the original size of image with 3 since imn this app the puzzle is of 3 rows and 3 columns along with one blank tile.
![]()
First see how it looks and then see how code is implemented for tiles creation and blank tile and image show on this page.
How image got visible and how image tiles are created and shuffled, and also how tiles move in required directions. All code samples till successful completion are shown below.
Slider Controller .h file

Slider controller .m file

Pop on table cell click

How image is initialized and tiles created along with blank space.

How Images tiles are made to shuffle.

Checking for Valid move.

Creating moves for tiles.


Get tiles at a particular point and final completion.

Without shuffling it looks like this.

After shuffling it looks like this.
Puzzle Solved Screen


Where do I get orgImage inside initPuzzle method?