Have you ever been approached with the idea –“Let’s build a mobile app”. Chances are ‘Yes’. But as a developer you soon get confused. You will have to answer the typical mobility questions such as:
- Which platforms to support – Android, iOS, Windows?
- Should you develop hybrid or native mobile apps?
- Should you go cross-platform?
There are many platforms to cater to and a lot of optionsto choose from. Native mobile app development will needseparate teams for Android, iOS and Windows. Hybrid letsyou use a single team and build using HTML/JavaScript/CSStechnology. But hybrid apps may be more difficult to scale,compared to native apps.In this article I’ll introduce you to a new framework by Progress called NativeScript. In the coming sections you will find a brief overview of NativeScript, addressing some of the key questions such as What, Why and How with regards to NativeScript.
What is NativeScript?
NativeScript is a technology which lets you develop truly native mobile apps with just JavaScript as a language. Hence the name NativeScript. If you are coming from web background, believe me when I say that you are already a native mobile app developer. NativeScript is how you build cross-platform native Android/iOS apps without web views. You can use plain vanilla JavaScript or TypeScript (which is my personal favorite) or the newly released AngularJS 2 from Google. You style your app using CSS, create UI using XML and use NativeScript provided UI components. You get truly native UI and native performance. NativeScript provides 100% access to native APIs via JavaS-cript. NativeScript is released as an Open Source technology, released under Open Source Apache 2 license (https://github. com/NativeScript/NativeScript).
Why NativeScript?
Let’s go through some of the salient features of NativeScript:
- Native UI: With NativeScript you get Native UI Platform– no Web Views. You define once and NativeScript will adapt and run everywhere.
- Extensible: You can easily reuse existing plugins from NPM, Cocoapods (iOS), Gradle (Android) and many NativeScript specific plugins on NPM.
- Cross-Platform: With just a single code base you now have the ability to write and deploy native mobile apps to iOS, Android and (soon) Windows.
- Accelerated Learning Curve: Since you reuse skills you already know, the learning curve is very minimal.
- Open Source: NativeScript is released under Open Source Apache 2 license.
- Backed by Progress: NativeScript as a technology is backed by the global leader in application development Progress.The company powers startups and industry titans and hasbuilt a community of over 1.9 million developers worldwide.
How NativeScript Works?
NativeScript or {N} as it is popularly addressed, is built from ground up. There are no DOM, no cross compilation and no plugins required. NativeScript is straight up JavaScript and runs as Native App. Under the hood it works over an abstraction. Your JS code is ran against a Virtual Machine packaged during build. NativeScript packages JavaScriptCore VM on iOS and Google V8 VM on Android. It provides 100% access to native APIs. NativeScript utilizes a bridge which is available in the runtime and uses reflection to look up native APIs at execution. During build time, it injects a metadata generated against list of APIs for the platform you build. Here is a block diagram which depicts NativeScript working at a high level:
NativeScript under the hood
Linux & Mac OS. Note that on Windows/Linux you can only create Android packages and not iOS package.
Set up your System:
I will be using a Windows machine as the development platformfor the rest of the article. There are certain pre-requisites youwill need to install before you begin. They are:
- Node JS
- JDK 8 or later stable official release
- Android SDK
Once the pre-requisites have been installed, open a command prompt and type the following code:
npm i -g nativescript
The above command installs NativeScript on your machine. You will use NativeScript commands using the shortcut “tns” (which stands for Telerik NativeScript). In order to check if everything has been installed correctly or not, you can execute the following in the command prompt:
tns doctor
tns doctor command checks your pre-requisite and NativeScript installation. If everything is in place, it will state that no issues were detected.
Create a NativeScript Project: It’s time to create a mobile app now. For this exercise I have chosen TypeScript as the language. TypeScript is a Superset of JavaScript which provides certain typed paradigms such as strong typing, Class, Interface etc. Run the following command on a command prompt: tns create MyApp –tsc
We create a new app by the name “MyApp” and tell NativeScript to use TypeScript as the language. NativeScript will go ahead and create the project for us.
Add Target Platforms:
Once the project has been created, we need to then add target platforms. Navigate to your project folder in command prompt and execute the following command: cd MyApp tns platform add android Since I am on a Windows development environment, I can add only Android as a target platform. Whereas if you are on Mac OS, you can add both Android & iOS as target platforms.
Editing NativeScript Projects:
In order to work with NativeScript projects, you can use any editor of your choice. NativeScript is all about XML, JavaScript and CSS files. I will be using one of my favorite open source editors from Microsoft called “Visual Studio Code”. It is a fantastic editor if you are working heavily on JavaScript/TypeScript based projects. Next, let’s take a look at the project structure.
NativeScript Project Structure:
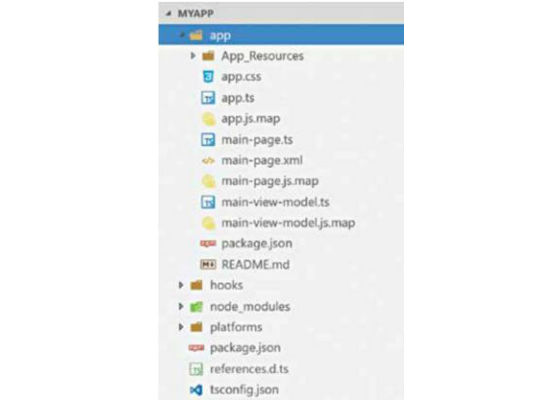
In Visual Studio Code, I have opened our project folder. As I said earlier, VS Code is just a text based editor and does a fantastic job in editing files like JS/CSS/XML and many other file types. Here is a snapshot of the new project we have created:
NativeScript Project Structure
Let’s go over the different pieces in the
project:
- appfolder – This is where the application related code resides. This is where you add new screens, business logic, style sheet etc. You will be working mostly in this folder.
- App_Resources folder –It contains your app assets such as icons, splash screens etc.
- node_modules folder – This is a folder where all the dependencies from npm are downloaded.
- platforms folder–Whenever we add a target platform, NativeScript will copy certain core platform related dependencies such as build scripts etc. to this folder
- Package.json– this file is used for listingdown your projects node module dependencies.
- tsconfig.json – Since I am using TypeScript as the language, this is a configuration for TypeScript compiler on how to convert my TypeScript code to JavaScript.
Bootstrapping the App:
Most of the things in NativeScript are guided by convention. NativeScript runtime will look for app.js file in your app. Note: During development time the file extension is .ts but when compiled, TypeScript compiler will generate .js file. Basically, TypeScript being a superset cannot be executed directly. It needs to be converted to ECMA Script Version 5. As a developer, I do not have to worry about that. The NativeScript compilation will take care of that. Just remember that your app starting point at runtime is app.js. Let’s take a look at the code and understand what is happening:
import * as app from ‘application’;
app.start({ moduleName: ‘main-page’ });
We import a core module called application. Then we say what screen/page of our app needs to be the starting page of our app. Notice we just say “main-page” – no extension provided. That is because, as I said earlier, NativeScript works by convention rather than configuration. NativeScript will now look for any page/screen with name main-page.xml and open that page after launching the app. As simple as that.
XML for UI Definition:
In NativeScript we define application screens/pages using XML syntax. XML as a language is great for defining hierarchical structure. Hence in NativeScript we do not reinvent the wheel but rather stick to what every developer knows. Here is the code snippet of main-page.xml:
<Page xmlns=”http://schemas.nativescript.
org/tns.xsd” navigatingTo=”navigatingTo”>
<StackLayout>
<Label text=”Tap the button” class=”title”/>
<Button text=”TAP” tap=”{{ onTap }}” />
<Label text=”{{ message }}”
class=”message” textWrap=”true”/>
</StackLayout>
</Page>
At the root, we have a Page element and it has some child elements. Page itself is a cross-platform NativeScript module. It knows how to render itself natively on different platform. Then we have a StackLayout – a layout element which stacks its child elements horizontally or vertically. StackLayout contains a label with text “Tap the Button”, a button with text “Tap” and another label to display a message. Page exposes certain lifecycle events and we have shown interest in one which has an event called navigatingTo. We have provided a handler to handle that event. Similarly, on the button we have tap event and we provide a handler to handle that event. Notice the syntax “{{ message }}” on the label. It is called as DataBinding expression. We have data bound text property of the label to message property of something. That something is an object which will be bound to this page at runtime. Similarly, the tap event of the button is bound using a data binding expression to onTap function.
Business Logic for Page:
It’s time to define the logic which powers our main-page. In the app folder you will find main-page.ts file. Let’s take a look at the code in main-page.ts:
import { EventData } from ‘data/observable’;
import { Page } from ‘ui/page’;
import { HelloWorldModel } from ‘./main-view-model’;
// Event handler for Page “navigatingTo”
event attached in main-page.xml
export function navigatingTo(args: EventData) {
// Get the event sender
let page = <Page>args.object;
page.bindingContext = new HelloWorldModel();
}
We define a function navigatingTo and we export it. Export just makes our function available to the outside world. Remember the navigatingTo event on the Page element in mainpage.xml – this is the function which will handle that event. We get hold of the current page and set its binding context to HelloWorldModel. Think of HelloWorldModel as a business object which handles all the logic of the screen/page. HelloWorldModel is defined in main-view-model.ts file. Here is the code snippet: http://dgit.in/HelloWNS
The HelloWorldModel class is self-explanatory. We have defined two variables namely _counter and _message. We also have a public property called message. We have a function called onTap. Whenever onTap is executed it decrements the counter variable and updates the message. Remember the data binding expression {{ message }} on label in main-page. xml – the text will be updated anytime the message changes.
Styling UI Components:
I love NativeScript because of its ability to let me style UI components with CSS rules. In NativeScript, we support a subset of CSS 3.0. The basic rules such as background color, color, font, border etc. are supported. For our current application we have written a global style rules in app.css. You can create page specific rules by creating .css. NativeScript will fist look for page specific CSS file and apply it, if not found it will use the application wide CSS styles defined in app.css. Here is our app.css style sheet file:
Build and Run the App:
This command will create the Android APK package
To run your app, you will issue the following command: In order to build the app, you will use the following command:
title {
tns build android
tns run android
button {
font-size: 42;
horizontal-align: center;
}
.message {
font-size: 20;
color: #284848;
horizontal-align: center;
margin: 0 20;
text-align: center;
}
It will deploy the app on any device connected to your system. You can run on emulator by passing the attribute –emulator. And here is the output of our app: NativeScript App running on Android.
Conclusion:
With NativeScript you can develop native Android/iOS apps with just your JavaScript knowledge. What’s more NativeScript is all about open standards – XML, JavaScript and CSS. Hope this article gave you an idea of what NativeScript is capable of. This is just the tip of the iceberg. Head over to www.nativescript.org to learn more.


