A basic guide to a popular JavaScript framework right now
To start with Electron js or simply Electron is an open source library developed by Github for creating
cross-platform desktop application with pure HTML, CSS and Javascript. This is accomplished by combining Chromium and NodeJS into a single runtime and apps can be packaged for Mac, Windows and Linux.
Electron started its journey on April, 2013 as the framework on which Github’s widely popular and hackable editor Atom was going to be built upon. Both were made open source in the Spring of 2014.
WHAT WE ARE TRYING TO ACHEIVE?
In this article we are trying to build a simple desktop application with the
help of Electron and learn some new and cool techniques to create a desktop application from your current web application. Though in this era web-apps are dominating the scene but desktop
applications are still widely popular and people tend to use desktop application more than webapps because of their availability and usability.
WHAT ARE THE PREREQUISITES?
This article is NOT for someone who is new to NodeJS. So, before you start, we are assuming that you have a little bit of knowledge about NodeJS. Also a little bit of HTML and CSS knowledge is
required to create the frontend part of the project. Here are a couple of links to brush up on NodeJS (https://dgit.in/NodeJS), HTML (https://dgit.in/HTML)and CSS (https://dgit.in/CSS). before we get started with the project.
WHAT WE ARE MAKING TODAY?
Our goal for today is to create a desktop chat messenger. Something sort of like Yahoo Messenger. Where
you can register, add friends and chat with them.
THINGS THAT WE ARE GOING TO USE TODAY
We are going to create the FrontEnd part by using HTML and CSS. The Backend will be in NodeJS with the
help of WebSockets and A HTTP Server. I am going to use ExpressJS for this purpose. The Github repo link will be shared at the end of the article and you can clone and try something else
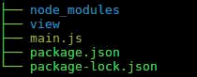
with the code. So our basic project structure looks like this.
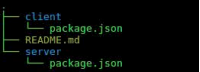
As you can see in the above image, here the client is the client side project which will have all the things that are written for the client, while all the webpages and the server will be on an express server to serve the requests. So our first goal is to create a server. For that we are going to install a number of pacakges. These packages are shown below.
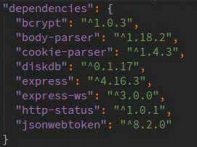
Every package has it’s own reasons to be in the server. Bcrypt is to hash passwords, body-parser is to parse request bodies via express, cookieparser is to parse cookies, diskdb as a database, express as the server, express-ws for managing websockets, http-status provides handy constants to manage http response code, and finally jsonwebtoken for managing auth token.
Now to start we are going to create a webserver at port 8692 that will be serving as our main backend. (code at https://dgit.in/CWSP8692) Our app will be consisting of 3 main functionalities.
1. Registering an User.
2. Login for an user.
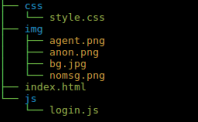
3. Searching and chatting with an user. So for this purpose we have created a few routes where all of the functionalites lie. Coming to the front end of the application, we’ve created a single page application for the ease of understanding and also other features are explained in the next section. Now, for the front end we have created a single page index.html. The folder structure for the client looks like this
And within view the files and folders are mapped in this way.
Now to start with Electron development the package that you need is electron. To install the package
via npm you need to write the following command.
npm install electron –save
DEVELOPING THE FRONT END
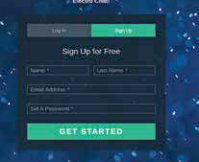
The front end part of our application is associated with one html page. That is index.html. In that page we have created 2 forms for registration and login and one input field for taking input from the user. There is also another part for the chatting part of the user.
Now the first part of any Electron application is to create a browser window object. For that purpose you need to include the Electron library using require. After that we are going to de-structure the exported data into two main objects. One is app and another one is browserwindow. The code for that looks like this.
const {app, BrowserWindow} = require(‘electron’);
Now along with these two we are also going to require path and url for utility purpose. That can be done by const path = require(‘path’); const url = require(‘url’);
Now over here we are going to create a function that will define a browser-window where the index.html
page will get rendered. (Code: https://dgit.in/Dev1).
Here the createWindow function creates a new BrowserWindow object win. That object then is associated with a url and that url is of the file that we have within view. We have also provided some options to the BrowserWindow object. Height and Width defines the initial height and width of the window and background color provides color.
To start our app we need to make some changes in the package.json. In package.json just add the following line in the scripts.
“start”: “electron .”
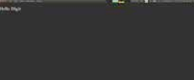
Add the following code in the index.html page: https://dgit.in/Dev2. And just start the application with npm start in the command prompt. The result of that will create a new window with the Html code that you have provided to it.
The output will now look somewhat like this.
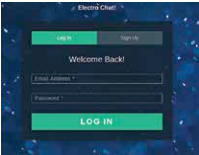
Now go ahead and make some changes and just refresh the page like you would have done it with the normal browser window. Your changes will be reflected. Now we are going to add two forms within the page. Now we will create two new forms, one for user to login to the application and another one for the user to register into the application. So the First form looks like this
Along with that, the registration form looks like this.
So for the registration part we have to make a form submit where we are going to add the user details into the database. The fun part of Electron is you can have either html5 apis for your stuff or you can have some npm
modules installed and can use them in the script. We have created a new js file to have all of our js codes for the page. Now the the dom is manipulated using jQuery. So for that we need to install jQuery in our client part of the application.
npm install jquery –save Now after adding jQuery we need to import the same into the js file. const $ = require(‘jquery’); After adding jQuery we have to create a function that will take validate and make a call to the backend to save the user in our database. Make sure you haven’t put any HTML5 validation
in the HTML because till now Electron does not support any HTML5 validation.
Now here we want to show some OS dialog box for the window. For that we are going to user Electron JS’s native dialog from the remote window. Remote is a part of Electron’s renderer process (web view). This lets the main process (app) to communicate with the renderer process. const {dialog} = require(‘electron’).remote;
Now after getting the user input from the user we are going to validate via our own validation and then do a post call to the backend server to register the user. Over here we are going to post the user’s info to the backend in the post options., then after success we are sending a desktop notification to the user and then automatically logging him/her in. (Code: https://dgit.in/Dev3) Over here dialog.showErrorBox is showing the error message from the response. Now the sendDesktopNotification
function looks like this: https://dgit.in/Dev4. Electron uses HTML5’s native notification module to show notifications.
Now if the user is successfully registered then he/she is automatically logged in to the system. For that we are calling the logIn function with the user provided email and password. (Code: https://dgit.in/Dev5)
Now over here we are again calling the backend system and getting a token in case of successful processing of the user’s credentials. Now we need the auth token for any further communications with the server. But I will suggest you to have a look at Electron’s sessions
and cookies to store the data into the cookie, for a better code practice. Now let us jump back to the backend to see what’s going on over there.
VISITING THE BACK-END
The back-end is mostly an express server with various routes configured
within the system. As we have discussed earlier, the main routes are Registration, Login and User. The
remaining part is to handle the websocket connection.
Now the registration route is pretty straight forward. Here we are getting values of fields from the request body then creating and saving new user or denying the request depending on the
passed parameters. The login route is also doing something similar. First, it is finding users
on the basis of email passed in the request body. Then it is matching the user’s password and then generating a token based on the user’s id. That token is a jwt token that is passed to the client on success and client is meant to send the token in the header for further authentication at that point (Code: https://dgit.in/Dev6)
Now after login the browserwindow creates a websocket connection with the back-end. That can be found
in the login.js in function connectWebSocket. In the connect webSocket function the user’s id is passed to the back-end so the server can remember the websocket object with an id. (Code: https://dgit.in/Dev7)
Now after log in the user will see a box to search for a friend and if that person is online then the system will connect the two by opening up the chat box. Now the first screen after login looks like this. This is where you can enter the email ID of another registered user to try and initiate a chat with them, but to make that happen needs a little more to be done in the back-end of the project.
 Once the user enters the friend’s email ID, it will eventually trigger a call in the back-end to search for the user. Then after searching the back-end, the server will trigger a
  call to engage second’s user’s system to start a chat. That will open a chat-dialog-box. This is where, in terms of output, things get really familiar, and you might see a similarity to a number of messaging clients that you’ve used, since many of them follow similar design ideology.
Now the API-call to searching a friend at this point is limited by the auth-token. Hence we need to pass the auth-token in the header. (Code: https://dgit.in/Dev8) As you can see the header in this request consists of x-access-token header parameter which indeed authenticates the request. To handle that, in the server side we have written a middleware for this purpose to authenticate the request. (Code: https:// dgit.in/Dev9)
Now after logging and searching, the screens will look like this for user 1.
Now we come to the actual chatting
part of this project. At this point, if the users write something in the text box then that message will be posted to the intended user depending on who the user is chatting with.
IN CONCLUSION
This brings us to the end of our basic Electron.JS project. As this is a starter project for Electron, we have been able to just scratch the surface of what is available in the Electron ecosystem. There are quite a lot of new things to discover which can let you built more powerful and useful projects. We would definitely encourage you
to visit their official site for getting more information.
Important Links:
• Electron: https://electronjs.org/
• Atom Slack: https://atomio.slack.
com/messages/
• Repo For this Code: https://dgit.in/
ElecGit