Backbone is a JavaScript library that provides a collection of modules that work together but can just as easily be used independently. It doesn’t preclude using other JavaScript frameworks / libraries such as jQuery. In fact, using jQuery is encouraged.
This flexibility can be freeing if you find other frameworks / libraries to be restrictive, but can also make Backbone hard to approach. Hopefully, this article will help you sink you teeth in deep enough that you can delve deeper on your own.
Before we dive into Backbone though, let’s first understand what it is trying to do. Chances are any web app you make involves manipulating data, and figuring out how it’s to be displayed in an HTML document. It’s common to load data from a web service as JSON, or XML, process it in JavaScript, and then display it in HTML. At this point you have multiple representations of the same data in your application that need to be kept in sync. If you are not careful in structuring your application, you can end up with code that is tied to your DOM.
This is where Backbone comes in with some basic modules that you can build your app on. These are basic enough that they are applicable to nearly every app. They also don’t make unnecessary assumptions about the structure of your code.
Backbone’s modules will look familiar to those who know of MVC (Model View Controller), but know that it doesn’t follow many of the conventions of MVC frameworks. Backbone includes four major components, the Model, the Collection, the Router, and the View.
Boilerplate
Like with any JavaScript library, before you can begin using it, you need to set up a basic HTML page that includes it, and any dependencies it has. The following code includes jQuery, Underscore (a requirement of Backbone) and Backbone all loaded directly from the internet, so you needn’t source them locally
<!DOCTYPE html>
<html><head>
<script src=”//cdnjs.cloudflare.com/ajax/libs/
jquery/2.1.1/jquery.min.js”></script>
<script src=”//cdnjs.cloudflare.com/ajax/libs/underscore.
js/1.7.0/underscore-min.js”></script>
<script src=”//cdnjs.cloudflare.com/ajax/libs/backbone.
js/1.1.2/backbone-min.js”></script>
<title>Backbone.js playground</title>
</head><body></body></html>
You can play with this code online on JS Bin at http://jsbin.com/ fineviyejo/1/edit Yeoman is a great tool for bootstrapping web projects. It properly structures your code in folders, downloads required libraries and builds and packages web apps from the command line.
Backbone.View
Let’s start with the bits of Backbone that actually shows something on the page. Here is a bare minimum View that when rendered and added to the page will display a button called “Hello World”.
var Hello = Backbone.View.extend({
tagName: ‘div’,
className: ‘hello’,
render: function() {
this.$el.html(‘<button>Hello World</button>’);
return this; } });
Let’s unpack this. In this snippet, we are creating a new custom View by extending the base Backbone View. The tagName and className properties define the tag that surrounds our view, and its class. In fact, if we just want a div then we need not even include a tagName since it defaults to div.
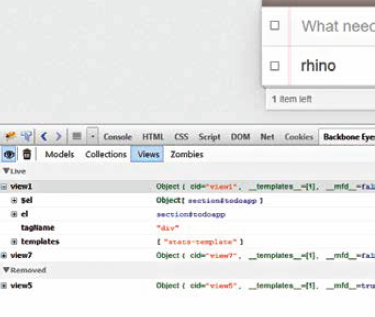
The render method is responsible for actually creating the content of the view. Here, it is adding the button labelled ‘Hello World’. Backbone views have an ‘el’ property that represents the raw JavaScript DOM representation of our view. If you are using jQuery then $el will be the jQuery-enhanced version the view. The Backbone-Eye add-on for FireBug and Firefox is a great way to inspect running Backbone apps.
In the render method, we use the jQuery html method to set the content of our view’s element. You could have directly manipulated the raw non-jQuery representation via el if you so desired.
To actually have this show up on the page, we first need to create an instance of the above view, and add it to the page body. The following lines of code should take care of that:
var h = new Hello;
h.render();
$(“body”).html(h.$el);
We first create a new instance of our new View, we then render it, and finally we set the HTML content of the page body using jQuery to our rendered view accessible via the $el (or el) property. Backbone is flexible enough that you could possibly automatically render the view in its initialize method and even add it to the page body. This is what the flexibility of Backbone gets you.
View sections under the View tab
Now let’s take this a step forward. We want this button to display a counter that shows how many times it has been clicked. The first step in this process will be to add an initialize method that sets this count to “0” (zero) in the beginning. Then we need some way to listen for, and respond to a mouse click event.
Thankfully, Backbone makes both very simple. You can add an attribute called events to the button that maps events to their corresponding methods. Here is our completed code (we removed some unnecessary stuff):
var Hello = Backbone.View.extend({
initialize: function() {
this.count = 0;
},
events: {
‘click button’: ‘updateCount’
},
updateCount: function(event) {
this.count++;
this.render();
},
render: function() {
this.$el.html(‘<button>Hello World: ‘ + this.count + ‘</button>’);
} });
What’s going on in the initialize method should be fairly obvious here; the more interesting bit is in events, the format of which is quite simple: ‘event selector’: ‘callback’ So in the above code we are listening to the click event on the element that matches the selector button and then calling the updateCount method in response. You can also listen to other events such as mouseover, dblclick, or contextmenu. The selector bit is the kind you use with jQuery to match elements, so it could be something like #btn.test.example. As you click the button you will see that the view will automatically update on page!


