For instance, you might have built a LOB application to take care of special HR needs or another one for case or invoice processing. Each of these applications are made available to the users within the organization for use.
Now, what if you need to scale out this application to many more users in say, multiple locations? Your company could be expanding into new cities and giving employees there access to the application hosted within your own premises would involve a good amount of network restructuring. While one way to solve this is be moving all such applications into a datacenter, there is one another model you should now consider.
This method is to migrate your application to the Cloud. This not only makes the application available for everyone in the organization, you can also start adding some of the more advanced cloud capabilities for your application after the migration is complete. For this article, we look at how you can migrate a web based application to the cloud.
The scenario we’re taking is quite simple, however, cloud migration allows for much more advanced migrations as well. In this scenario, you have a Web based application, written say in ASP.NET using Visual Studio and talking to an SQL Server database.
There are two simple ways to migrate the application to the cloud – in this case, we are talking about the Microsoft Azure cloud. You can see a representation of both of these in the diagram given below.
The first way – and probably the easiest – would be to simply create a set of Virtual Machines in the cloud running the same OS and base platform as what is required by the application. For instance, you could setup 2 VMs with Windows Server 2012 R2. One can be configured with IIS and .NET Framework while the other is used for installing SQL Server. You can then simply copy over the application as well as the data to these cloud based VMs and have the application ready for use.
The other way is a little more involved, but is still quite simple. Let’s see how this works.
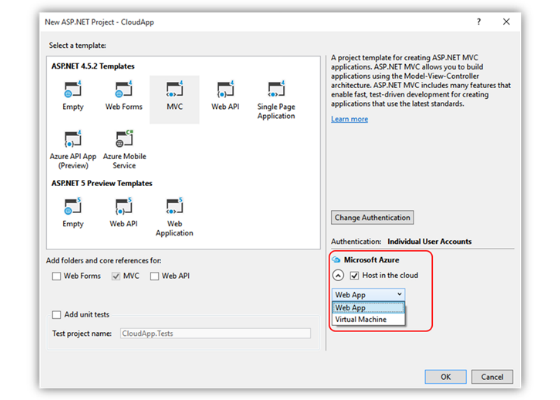
The place to start would be either in the Azure Portal or if you’re developing in Visual Studio, the IDE itself lets you do this quite easily. You can do the latter by simply creating a new project in VS2013 or 2015 and selecting a Web application. In this, make sure you select the Host in cloud option and set it to Web app as shown in the screen below.
Note that you can add this role to an existing project as well by right clicking it and selecting it.
In either case, your ASP.NET application is now ready for deployment to the web. However, you also need to get the database into the Azure SQL database. Depending upon the complexity of the data as well as whether you’ve extended the database for UDF or UDTs, there are different approaches you might need to use.
If the database is simple enough, the easiest ways are to either export the schema and data into BACPAC files from within SSMS, use the Import/export wizard or the Deploy to Azure SQL database options that are available.
As long as the database is available on Azure – whether created through the portal – or through Visual Studio as shown in the step above, the schema and data will get migrated.
Now get the application code ready in Visual Studio. After you build it to ensure there are no issues, point the connection strings for the database to the Azure hosted server. Check the application again to see everything works fine.
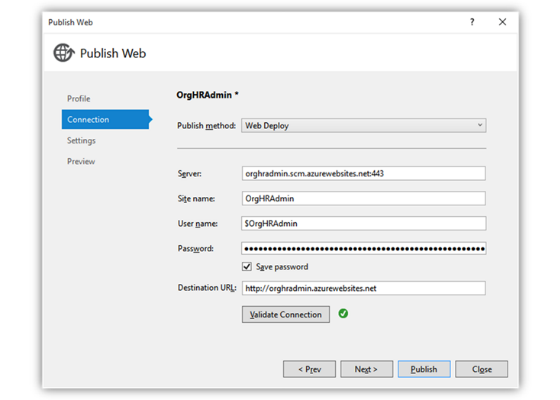
Once you are ready, all you need to do is select the Publish option. This will let you choose where you wish to publish the application. Select Azure and provide the credentials and select the Web App you created earlier as shown.
This will then ask you to validate the web settings for deployment.
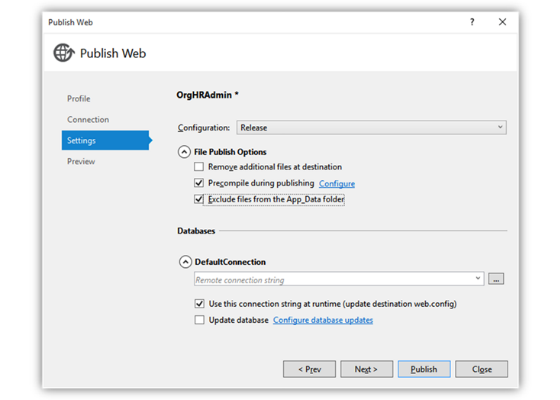
In the final step, you can select the configuration, other settings, and even update the connection string if you’ve forgotten to do this step earlier.
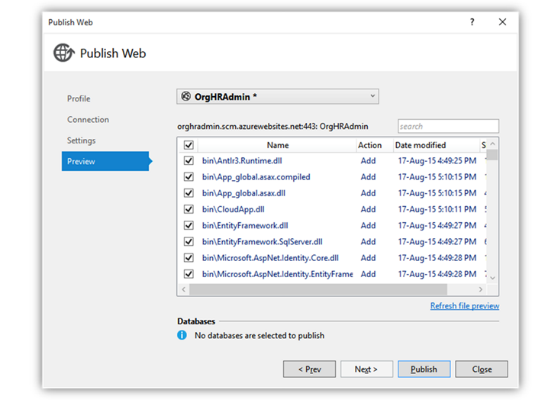
The final step lets you optionally preview what is going to be deployed and then start the publishing process.


